LantauMama - making healthy living accessible
  • Blog
    • Family Fun
    • Cantonese School
    • About Me
  • Classes
  • Events
  • Shop
  • Links

LantauMama: Kombucha Class 28 Feb 2017

5/2/2017

 
Picture
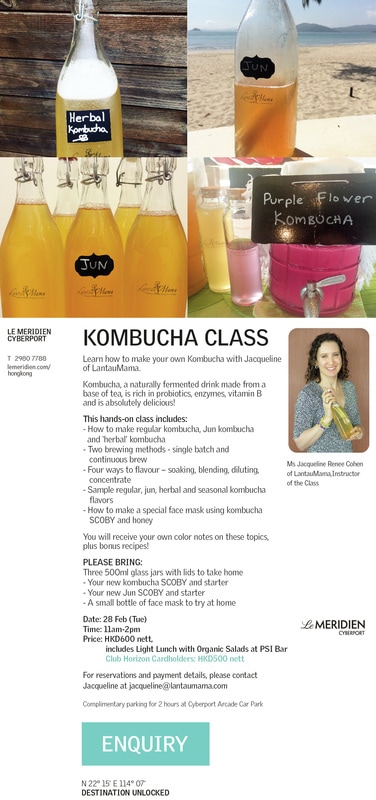
Join me on TUESDAY 28 February at Le Meridien Cyberport to learn how to make KOMBUCHA!
​

​Learn, taste and take home your own SCOBY and starter to brew delicious kombucha at home.

This class is suitable for beginners and kombucha brewers.  There will be lots of time for Q&A at the end of the class and over lunch.


Date:  Tuesday, 28 February 2017 11:00 am - 2:00 pm
Location: Le Meridien Cyberport, Pokfulam, Hong Kong
Price: 600 HKD, including an organic salad bar lunch and two hours free parking

Learn:
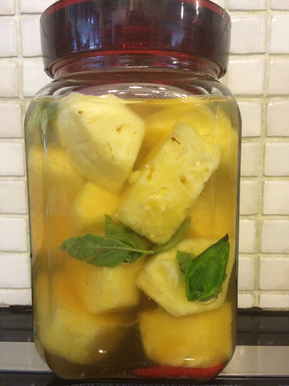
To make regular kombucha, jun kombucha and herbal kombucha
Four ways to flavour kombucha
Two ways to brew kombucha - single batch and continuous brew
How to make a face mask using kombucha

Try:
Loads of kombucha - regular, jun, herbal and different flavours!

Take home:
Full colour notes
Your own kombucha SCOBY and starter 
​
Bring:
1 x 500 ml jar for your regular kombucha SCOBY and starter
1 x 500 ml kar for your jun kombucha SCOBY and starter
1 x small jar for a sample of the face mask we will make in class

Note: The jars should have a lid that can seal in liquid.


Registration Form Below​

    LantauMama Kombucha Class - Registration Form

    [object Object]
Submit

LantauMama Event: Sandor Katz in Hong Kong

20/11/2016

0 Comments

 
Fermentation revivalist, author and teacher, Sandor Katz, is on his inaugural trip to Hong Kong to work exclusively with the chefs of Mandarin Oriental, Hong Kong to broaden their use of fermentation.  Sandor will offer one public seminar for home fermenters during his visit through LantauMama on 13 January 2017.  This remarkable event is a chance for you to spend the afternoon with Sandor as he demystifies fermentation for home enthusiasts and sample an array of delicious ferments from the kitchens of the hotel.  

CLICK HERE TO SEE PHOTOS AND VIDEOS FROM THE EVENT

Registration Closed

Please fill out the registration form on this page.  

Once we receive your completed registration form, we will email you with payment details.  Limited spaces available.

Seminar details:
Date: Friday, 13 Jan 2017, 2:30 – 5:30 pm
Location: Mandarin Oriental, Hong Kong
Price: 2,000 HKD + 10%

Included: 
  • Lecture by Sandor Katz
  • Fermentation demonstration by Sandor Katz
  • Fermented treats prepared by the chefs at Mandarin Oriental, Hong Kong
  • Fermented drinks prepared by LantauMama 
  • Signed copy of Sandor Katz’s new 2016 Wild Fermentation book
  • Q&A session with Sandor Katz
 

    Registration Closed

Submit
Picture
Picture

Related Press Articles

Healthy Living Asia - Fermenting Revivalist SANDOR KATZ in HK
Healthy Living Asia - Q&A with Katz
SCMP - ​How Fermentation is Making Hong Kong Restaurant Dishes more Flavourful and Health
Hong Kong Tatler - ​Demystifying the Art of Fermentation with Sandor Katz 
0 Comments

Cookies or Granola Bars, Baked or Raw! (updated)

14/1/2016

 
Print Friendly and PDF
PictureBaked and ready to eat
(Vegan, Gluten Free, Refined Sugar Free, Baked or Raw)

Cookies or Granola Bars!
Baked or Raw!
The choice is yours!


These are so easy to make, and they work fabulously as raw bars that last forever in the fridge, or fresh cookies to be eaten within 2-3 days.


Ingredients
  • 3 Large ripe bananas
  • 1/2 Cup coconut oil (melted)
  • 1 Tbsp vanilla (more or less to taste)
  • 1 tsp baking powder
  • 1 Tbsp cinnamon (more or less to taste)
  • 2 Cups GF oatmeal
  • 1/2 Cup hemp seeds
  • 1/4 Cup chia seeds
  • 1/4 Cup coconut flakes
  • 1/4 Cup chopped mission figs (or other dried fruits)
  • 1/4 Cup of cacao nibs (optional)

Directions
  • Mash bananas
  • Add coconut oil, vanilla and mix
  • Add baking powder and mix, then let sit a few minutes
  • Add the dry ingredients and use your common sense - you can add a bit more or a bit less until the batter looks like it does in the photo below - not too wet, not too dry, enough so it can form 'dough' to put on the baking tray
  • Mix well and let sit for 10 minutes before baking

Baked Option
  • Makes 24 cookies
  • Bake at 175 C / 345 F for about 15-20 minutes depending upon your oven

Raw Option
  • Makes 1 tray of cookies and 1 tray of bars
  • Shape the cookies smaller and thinner than those for the oven (see photo below)
  • Shape the bars with your hands (see photo below)
  • Dehydrate on non-stick sheets for 24 hours at 115 degrees
  • Remove the non-stick sheet and place cookies and bars upside down on the mesh tray
  • Dehydrate further until you reach your desired dryness 
  • If you plan to eat them all within the next 24 hours, keep them a bit moist
  • If you want the to last longer, then make them very very dry (my preference)
  • Store in a closed container in the fridge

Picture
Not too wet, not too dry
Picture
Shaped into bars for the dehydrator
Picture
Left for the dehydrator - Right for the oven
Picture
Dehydrated cookies stacked - yumm!

Spicy Kraut

7/1/2016

0 Comments

 
(Fermented, Raw, Vegan, Gluten Free, Sugar Free)
Picture

This is a simple and delicious sauerkraut, with lots of flavor that tends to ferment very quickly. You can make this with or without the chili, it is very flavorful due to the garlic, coriander and spring onion. 

Ingredients
  • 1 kilo of carrots and cabbage combined
  • 2% of the total weight in Celtic sea salt, approximately 4 teaspoons
  • 1 teaspoon of minced garlic
  • 2 whole chilies with the tops cut off
  • 1/4 cup of minced coriander
  • 1/4 cup of minced spring onion
 
Variation: the last four ingredients you can use more or less depending upon your preference

Directions
  • Set one large cabbage leaf aside to use later
  • Grate the remaining cabbage and carrots
  • Weight the grated cabbage and carrots
  • Add 2% of the total weight in Celtic sea salt or Himalayan pink salt 
  • Massage/pound/squeeze until enough liquid comes out to cover the vegetable mixture
  • Add the following to taste (more or less of each per your preference) 1 teaspoon of minced garlic, 2 whole chilies with the tops cut off, 1/4 cup of minced coriander, 1/4 cup of minced spring onion and mix well
  • Transfer to your fermenting jar
  • Press the mixture down until the liquid covers it
  • Cover with the large cabbage leaf, and press down again
  • Put a weight on top (anything to keep the vegetables and cabbage leaf under the liquid)
  • Cover and let sit for 4-7 days, taste, when done store in a glass jar in the fridge.
  • Due to variations in weather and personal taste, you may decide to ferment this for more or less time, that is perfectly fine!
  • It will last in the fridge for a year, with the flavor slowly developing.
0 Comments

Cacao Mint Kefir

22/12/2015

0 Comments

 
(Fermented, Raw, Gluten Free, Vegan, Refined Sugar Free)

Here I am in Niseko again, enjoying skiing, snow, yummy local food and family time. The weather is very dry here, so hydrating is important. Besides my daily green smoothie, kombucha and lots of water, I often indulge in this Coconut Milk Hot Cacao. This time I wanted something seasonally satisfying, but cold... this Cacao Mint Kefir hits the spot!

Super easy to make and delicious!

Ingredients
  • 500 ml water kefir
  • 1 large medjool date (no pit) 
  • 1/8 cup of hemp seeds 
  • 1 Tablespoon raw cacao
  • 1 teaspoon vanilla powder,
  • 1 scant teaspoon of cinnamon (optional)
  • 1 tiny pinch salt
  • 4 drops peppermint oil

Directions
  • Add all the ingredients to your blender
  • Blend until smooth
Picture
Variations
  • For a sweeter version, use 2 dates
  • Instead of hemp seed you can use 6 almonds or 10 cashews (for either soak overnight) 
  • For a 'pudding' make a glass, then soak chia seeds in it for 30 minutes or more and refrigerate.  
0 Comments

Fermented Salsa - any excuse to eat chips

23/9/2015

 
Picture
(Raw, Vegan, Gluten Free, Sugar Free, Fermented) 

Salsa is always popular, by fermenting it the taste is even more extraordinary and it lasts longer!  Basically, it is your normal salsa recipe, with some extra salt, then jar it up and letting it sit on the counter a couple of days to ferment.

I love that it lasts a long time in the fridge once it is made, but it might not last so long because it is good. The first bite is a bit strange, sort of fizzy like it has 'gone off' but this is what you want... after that it gets addictive.

You can ferment your regular salsa by making yours as usual, and following the directions below.


Ingredients
  • 1 kilo of tomatoes, diced
  • 1 large onion, minced small
  • 4 cloves of garlic, minced small
  • 1 bunch of cilantro, chopped with leaving some leaves whole
  • 1 bunch of spring onion, chopped small
  • Optional - 1-3 chopped chilies
  • 2% of the overall weight in Celtic sea salt or pink Himalayan salt
 
Directions
  • Prepare all of the ingredients above as instructed
  • Mix everything except the salt
  • Weigh your salsa on a digital scale
  • Add 2% of the overall weight in salt
  • Mix well
  • Put in a closed jar, leaving at least 20% of space at the top of the jar for expansion

Let sit for 2-3 days, until it is slightly fizzy.


Store in the refrigerator, fermented salsa will last for weeks.

Serve it with chips, on salads, in tacos or burritos, over fish, however you would normally enjoy your salsa!

Fermented Salsa - some other methods
Fermented Pico de Gallo
Probiotic Kombucha Salsa with Grilled Pineapple

Photo: Fermented Salsa, Raw Cashew Not Cheese, Raw Buckwheat Crackers, and a bowl of flowers my daughter put on the table.

Chocolate Berry Chia Pudding

21/6/2015

0 Comments

 
(Raw, Vegan, Gluten Free, Refined Sugar Free)
Picture

I make some variety of this when I have a craving for something that super rich and filling with just one spoonful!  Truly, this lasts a long time as it is so rich and filling that you only need a spoonful to feel satisfied. 

Ingredients
  • 1 can of full fat coconut milk (or homemade)
  • 1/2 cup of raw cacao powder (or carob powder)
  • 3 Tablespoons of coconut butter
  • 7 dates with the pits taken out (only 5 if you use carob powder as it is naturally sweeter)
  • 1 Tablespoon of vanilla powder (or extract)
  • 1 teaspoon of a spice - cinnamon or cayenne or chili - this will give it extra depth
  • 1/8 teaspoon of high mineral salt (Celtic or Himalayan)
  • 2/3 cup of chia seeds
  • 1 bag of frozen berries (mixed or single variety)**
  • 1 cup of cut fresh fruit

** Adding the frozen berries is optional - this recipe works with and without the frozen berries.  Without them it is much richer and more decadent.  With them it is a bit more of a gentle taste and not as chocolate dominant.  Try it both ways!!

Directions

Option 1 - longer, and smoother
  • Blend the first 6 ingredients in your blender (I use a Vitamix)
  • Pour into a bowl, add the chia seeds and mix well
  • Refrigerate until set
  • Spoon into the blender, add the frozen berries, blend well
  • Separate into mini serving bowls
  • Serve with fresh fruit (berries, pomegranate, etc...), nuts, seeds, granola etc... sprinkled on top

Option 2 - shorter, and textured with the chia seeds
  • Blend the first 5 ingredients and the frozen berries in your blender (I use a Vitamix)
  • Pour into a bowl, add the chia seeds and mix well until the chia seeds are evenly mixed in
  • Separate into mini serving bowls, and refrigerate until set (4+ hours)
  • Serve with fresh fruit (berries, pomegranate, etc...), nuts, seeds, granola etc... sprinkled on top

Store in a glass bowl or jar in the fridge, there is no need to freeze this.  It gets quite 'solid' from the coconut and the chia seeds.

Serving Ideas
  • In small bowls with fresh berries
  • Layered in wine glasses with coconut cream or coconut yogurt and berries
  • Use as an icing for a cake or cupcake
  • Package in small glass jars and give to friends
  • Eat with a spoon from the bowl because you can't wait and it is so yummy!

Bonus Idea
I made this in the morning in my Vitamix, did *not* wash my Vitamix, then made my green smoothie - extra delicious!


0 Comments

Milk Kefir Cream Cheese

15/6/2015

0 Comments

 
Fermented, Gluten Free, Sugar Free
Picture

Milk Kefir Cream Cheese
This is my favorite way to consume milk kefir - as healthy probiotic filled kefir cream cheese!  It is super easy to make, and tastes better than any store bought cream cheese or 'shmear' I have ever tried.  

Ingredients
  • 1 liter of thick dairy milk kefir (goats milk is great!)
 
Directions
  • Remove kefir grains and 10% of kefir to use to start your next batch of milk kefir
  • ​Strain through a nut milk / Chinese soup bag
  • Put bag in a colander, in a glass bowl
  • Put a weight on top and let is strain and ferment on the counter for 24 hours 
  • Stop straining when it gets to the thickness you desire
  • Flavor to use as a dip or spread
  • Save the whey for future use


Flavor Ideas for Kefir Cheese
  • Nutritional yeast, smoked paprika, onion powder, high mineral salt
  • Mixed herbs and garlic powder, high mineral salt
  • Fresh herbs, scallions, high mineral salt
  • Chopped sun dried tomatoes, basil, high mineral salt
  • Dried apricots and cinnamon 

NOTE:  For Vegan, Non-Dairy, Nut/Seed Fermented Cheese - click here

0 Comments

Vegan Nut / Seed Cheese - Fermented

20/5/2015

1 Comment

 
Raw, Vegan, Gluten Free, Fermented, Sugar Free
Picture
This works as a yummy spread, a dip, a sauce, however you want to use it.  It is easy to make, and flexible to flavor.
The fermentation gives it a special tang, plus probiotic goodness.  You can make it without the water kefir grains, and it will still be yummy, just not fermented

Ingredients
  • 2 Cups of nuts or seeds (soaked at least 8 hours)
  • 4 Tablespoons of water kefir grains
  • Filtered water (enough to blend everything smoothly)

Directions
  • Blend in a high power blender (Like a Vitamix - see more here)
  • Strain through a nut milk / Chinese soup bag
  • Place the nut milk / Chinese soup bag in a strainer, and place the strainer in a bowl
  • Put a weight on top and let is strain and ferment on the counter for 24 hours 

  • At this point can flavor and use as a dip or spread
  • Alternatively, put in a cheese mold and let dry for days in a low temperature dehydrator (less than 115  F).  You can then let it ‘age’ and get a harder ‘cheese’ to be used like a Parmesan. 

Flavor ideas
Cheesy - nutritional yeast, onion powder, salt, pepper, herbs
Spicy - nutritional yeast, smoked paprika, garlic powder, salt, pepper
Herby - Fresh or dried herbs of your choice, salt
Fruity - Dried apricots

Hints
Try mixing your nuts or seeds!  
Macadamia and cashews
Sunflower and sesame


1 Comment

Spicy Pineapple and Basil

8/5/2015

 
Picture

(Raw, Fermented, Gluten Free, Vegan)

Pineapple is one of those fruits we seem to get year round without much difficulty.  Some of my favorite drinks have pineapple, like my Kefir Colada.

This ferment was born out of the desire to use readily available ingredients to make something with an Asian twist!  The basil and chili are from my garden.  

I was inspired to use basil after a fabulous pineapple and thai basil smoothie I had in Thailand last year.  Sri Lanka, India, and other Asian countries have a popular snack of pineapple or other fruits with salt and chili. Put it all together, ferment it, and it's even more yummy!

You can easily adjust this to use other spices and herbs for a flavor creation of your own.

Ingredients
  • 1 fresh ripe pineapple cubed
  • 1-10 chilies of your choice. Sliced down the side
  • 1 large handful of fresh basil
  • 2 teaspoons of Celtic sea salt or pink Himalayan salt
  • 1 cup plain water kefir **
  • 1 cup filtered water

Directions
  • Cut the pineapple in cubes
  • Slice the tops off the chilies, or the sides if you want spicier!
  • Put the chilies in the jar
  • Layer the pineapple and basil
  • In a measuring cup put in the salt and water kefir, mix this well
  • Pour the liquid over the pineapple, then top up with filtered water

Let sit for 2-5 days, until the pinapple has a slightly fizzy and flavorful taste.  Stores well in the fridge.

The jar in the photo has a 'valve' on top to let the gas out, you can use any glass jar or fermenting container, just be sure to 'burp' 1-2x a day to let the gas out.

Eat it plain, cut and serve as a condiment, cut it up into salsa, blend it and use it to spice up a drink or dish!

** NOTE:  If you don't have water kefir, just ferment in a 2% brine solution (2% salt for the amount of water you add) this works great as well!  You can always add more salt to taste after it is done.


<<Previous
Forward>>
    Picture

    LantauMama's Instagram

    Categories

    All
    Breakfast
    Dessert
    Events
    Fermentation
    Healthy Living
    Hong Kong
    Kefir Class
    Kids
    Niseko
    Recipes
    School
    Snacks
    Tuesday-tips

    Archives

    May 2018
    January 2018
    December 2017
    October 2017
    August 2017
    March 2017
    February 2017
    November 2016
    January 2016
    December 2015
    September 2015
    June 2015
    May 2015
    March 2015
    September 2014
    August 2014
    July 2014
    June 2014
    May 2014
    March 2014
    February 2014
    January 2014
    December 2013
    November 2013
    October 2013

    RSS Feed

    View my Flipboard Magazine.
Thank you so much for taking the time to visit Lantau Mama, truly I am flattered that anyone reads this!  
Feel free to contact me anytime via LantauMama @ Twitter I would love to hear from you.
The links below are how I try to cover my hosting costs without using advertisements.
My Iherb Page
Weebly Discount Link