LantauMama - making healthy living accessible
  • Blog
    • Family Fun
    • Cantonese School
    • About Me
  • Classes
  • Events
  • Shop
  • Links

Gluten Free Bagels - Not from Brooklyn

30/1/2014

 
Print Friendly and PDF
PictureSee more photos below
(Gluten Free, Vegan)

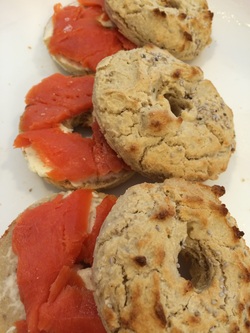
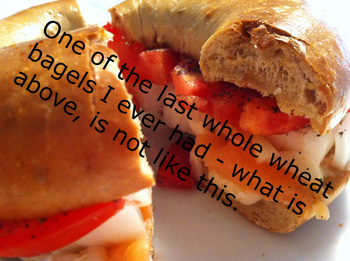
I love love love NY Jewish Bagels - they are both emotionally satisfying and yummy.  When I am back in the USA, I usually have one huge one every morning - a thin shmear of cream cheese, piled with lox, tomatoes, vidalia onions, pepper... and sometimes the non traditional avocado instead of cream cheese. 

In my over 20 years living away from the USA, it is the single top food I miss.  Sure I have tried bagels in London, Tokyo, Hong Kong and Beijing... but it's really not the same.

Since going wheat free, it made my last trips to the USA kind of painful.  I did discover that I could eat the Sprouted Spelt Bagels from Alvarado Street Bakery, so I have these when I am back in the USA and they are really excellent, but NOT gluten free. Reminder, spelt is NOT gluten free. 

I was getting pretty desperate to try a gluten free bagel recipe, my expectations were suitably low, I was not expecting Brooklyn Bagels... but I wanted something with a chew that was different from bread or a roll.  

I think I found it with this combination - even hubby had seconds and the kids loved them too!  Served with cream cheese, wild salmon lox, yummmmmmy.  So good in fact, I forgot to slice the tomato and onion!

Many GF bagel recipes have coconut and almond flour as the main and only flours - I make so many other things with those ingredients, and I knew bagels they would not be.  At the same time, i knew just using Bob's GF All Purpose Baking Flour would not be right either... so I combined the ideas.  

So I found this easy recipe at Bob's Red Mill and modified it.

Ingredients
  • 2 Tablespoons of chia seeds
  • 12 Tablespoons of warm water

  • 2 1/2 cups Bob's GF All Purpose Baking Flour
  • 1/2 cup tapioca flour
  • 1/2 cup almond flour
  • 1/2 cup coconut flour
  • 1 teaspoon xanthan gum (not needed if you use Bob's 1:1 GF Flour)
  • 1 teaspoon Baking Powder
  • 1 teaspoon instant yeast
  • 2 Tablespoons coconut sugar 

  • 1 cup warm water
  • 3 Tbsp olive oil

For the topping:
  • 2 Tablespoons of chia Seed
  • 1 Tablespoons of salt and black pepper or other toppings of your choice - sesame seeds, poppy seeds, garlic, onion, etc...

Directions
  • Preheat oven to 180 C / 375 F
  • Mix the chia seeds and water in a 2 cup glass measuring cup and let sit for 10 minutes 
  • Put all the dry ingredients in your food processor or mixer and blend for a few minutes
  • Add the extra cup of water and olive oil to the chia and water and mix you made above
  • Add the liquid mixture to the dry ingredients in the food processor and mix well

  • Prepare a bowl with room temperature water that is big enough to put your hands in
  • Prepare two baking trays covered in parchment/baking paper or a silicon mat
  • You do not need a bagel/donut pan, but can opt to use one, I preferred the bagels that were not made in them.
  • Wet your hands to shape the dough into bagel shapes 
  • I made bagel shape, stick shape and one small 'bagel bite'

  • Once you have them all laid out, you can add toppings as you desire - chia seeds, salt, garlic, onion, poppy seeds, sesame seeds, whatever you fancy.
  • Let them sit on the counter for about 30 minutes before putting them in the oven
  • Bake for 12-15 minutes depending on your oven.
  • Enjoy on their own or with your favorite bagel combinations!


Helpful Hints
Form them by hand, with very wet hands.
Bake on a metal tray with parchment paper, not silicon tray.
After you bake them, once they cool, slice them and freeze them right away.
Then, when you want a yummy gluten free bagel, you can just get one from the freezer.  
This helps keep the fresh flavor for much longer.
(you can do this for bread and store bought bagels too -but ALWAYS slice first!)

Picture
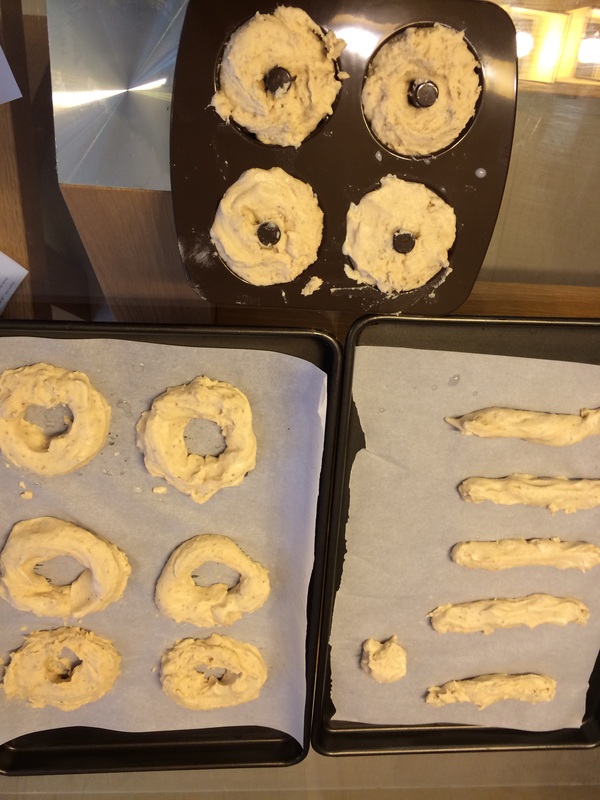
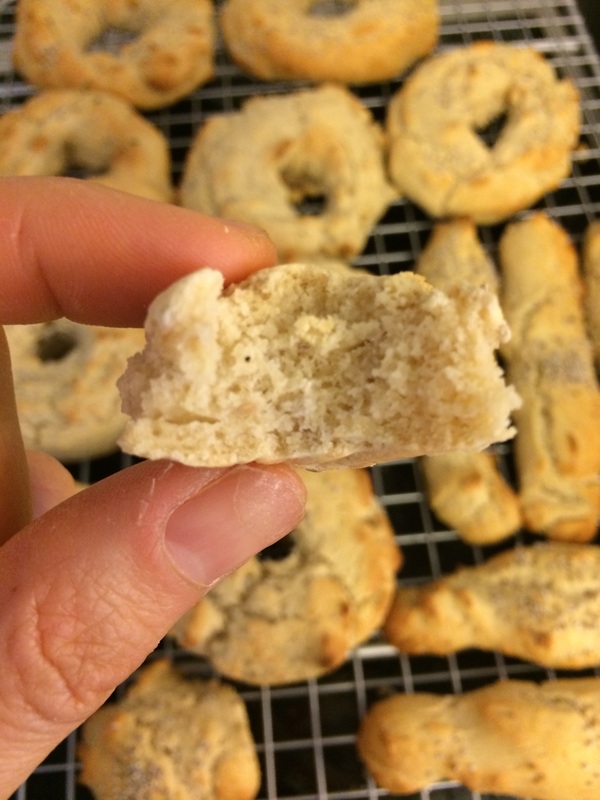
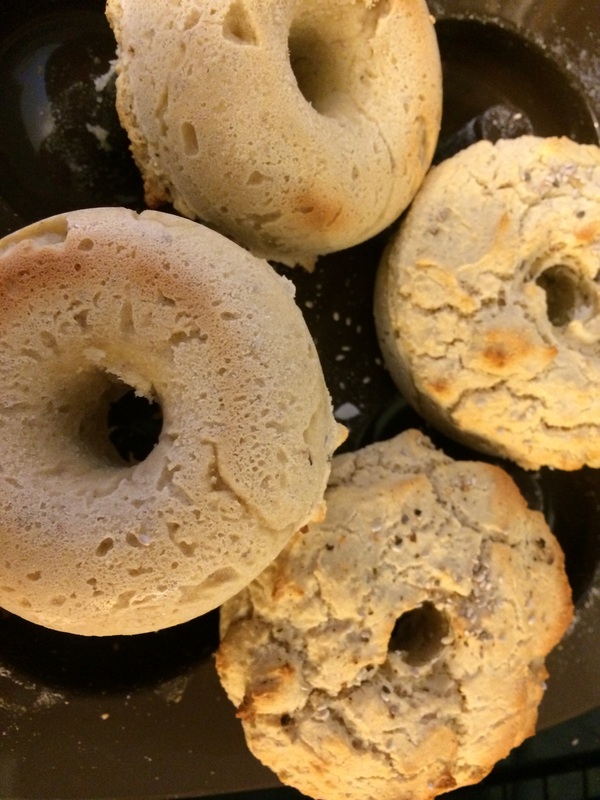
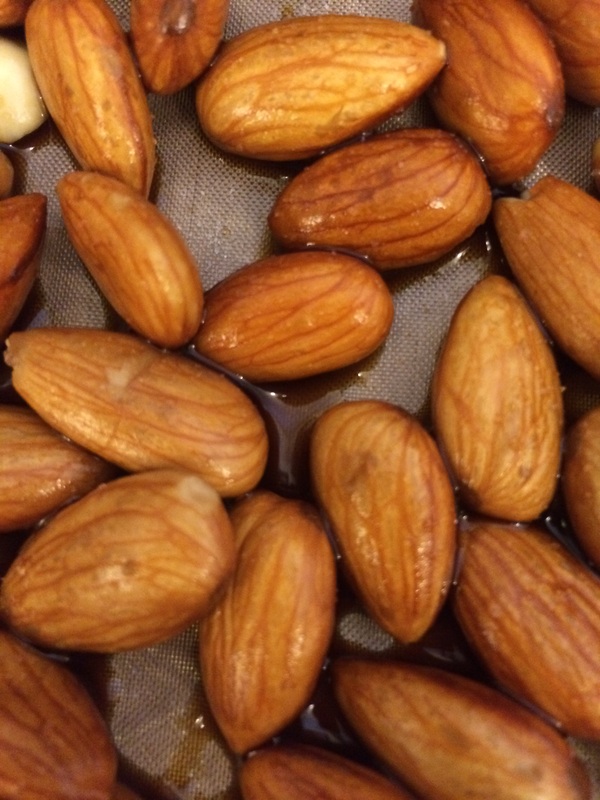
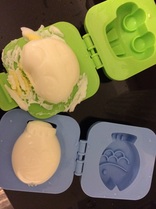
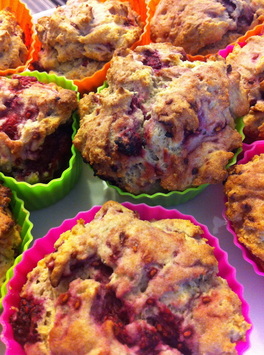
Pretty ugly, but I really had no hope these would be any good! Every shaped worked fine. My least favorite are the ones from the silicon bagel pan.
Picture
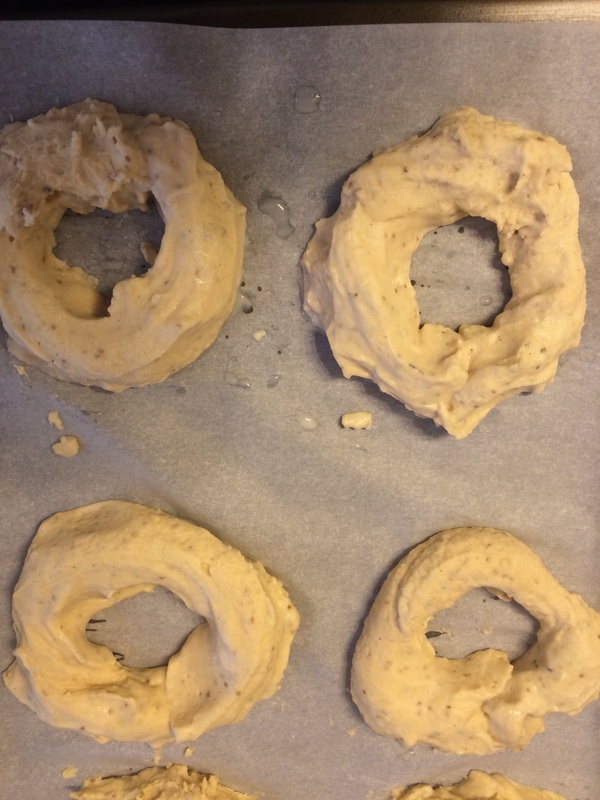
The best formed ones were made with wet hands, as you can see on the bottom left.
Picture
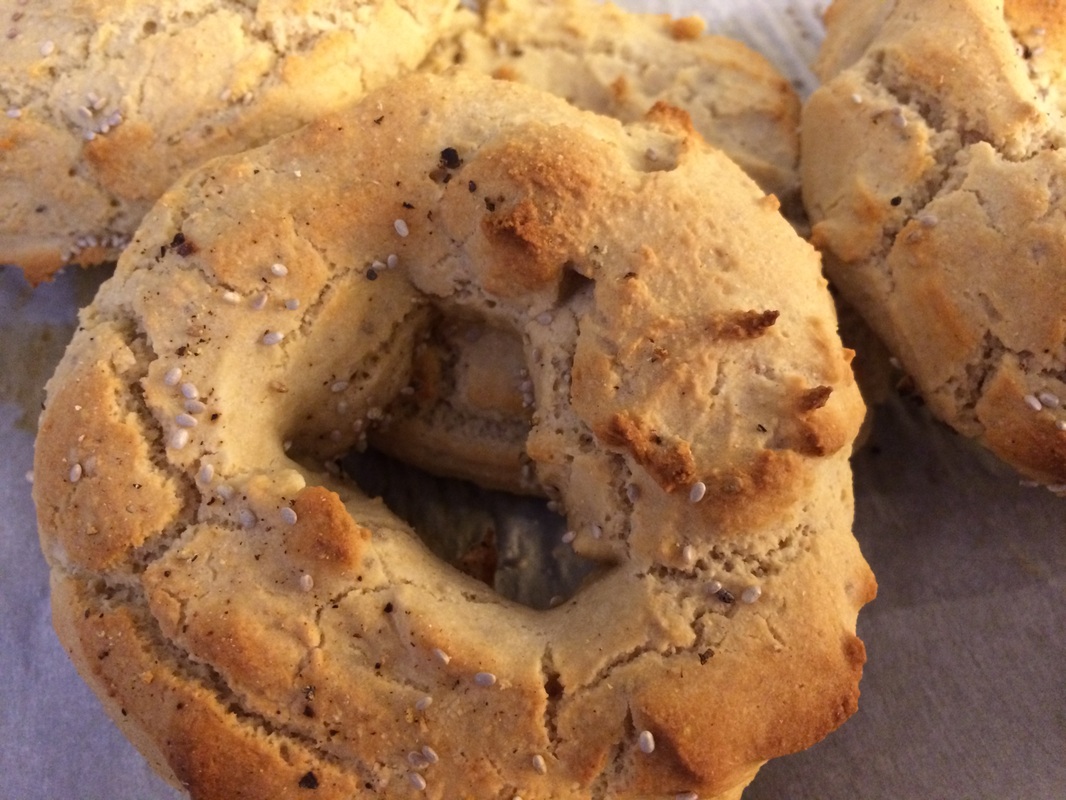
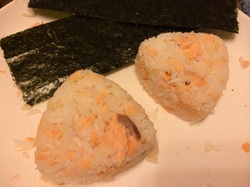
The outside looked pretty good, and had a nice crunch to it.
Picture
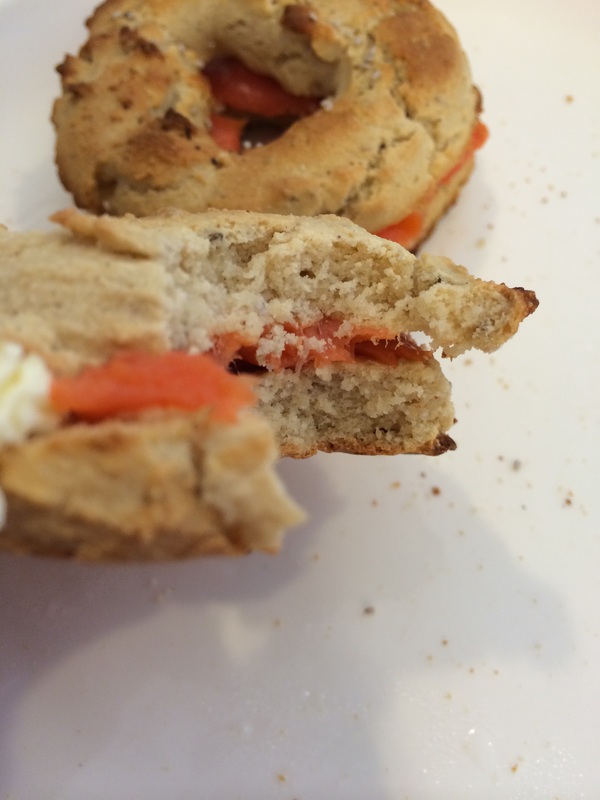
Super delicious! Will be even better next time fully loaded with cream cheese, lox, tomatoes and onion!
Picture
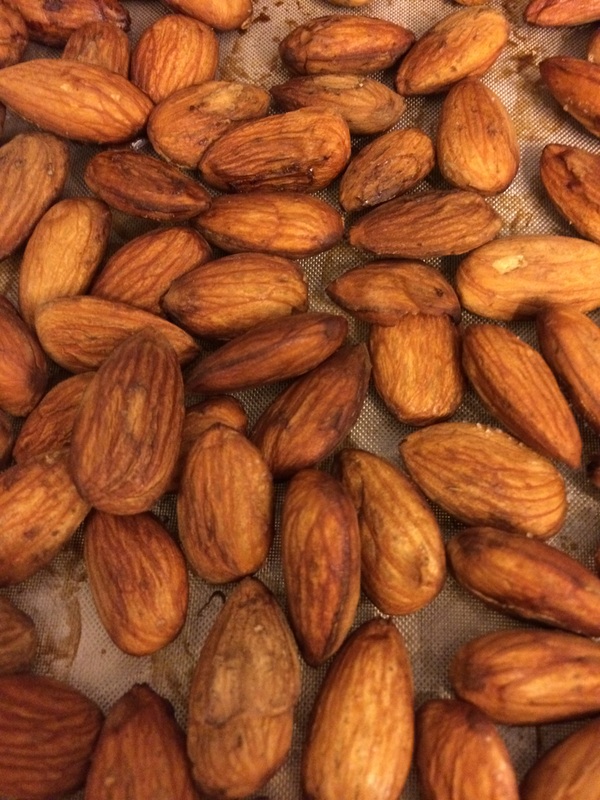
You can see the texture - not a Brooklyn bagel, but not bad! All the shapes came out just fine and tasted the same.
Picture
My least favorite were those made in the silicon bagel pan - the outside didn't crunch up as nicely.
Picture
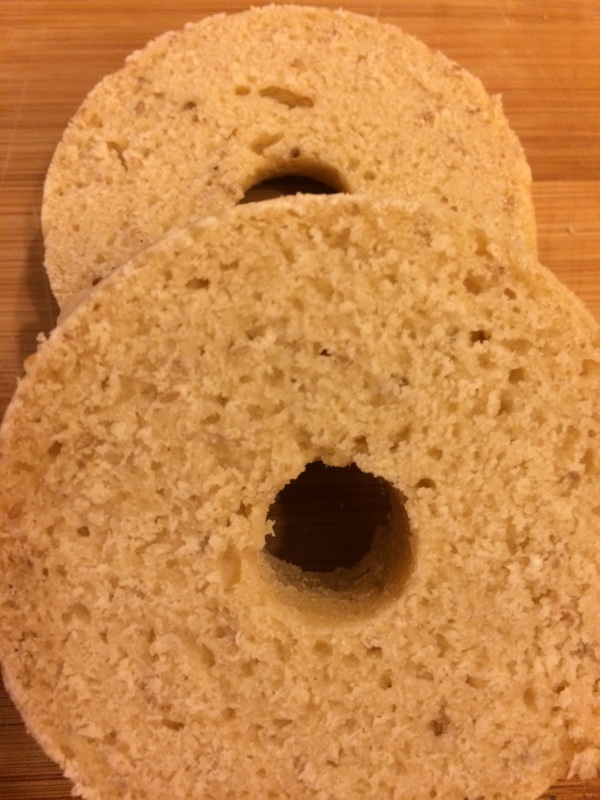
The inside was not 'bagel chewy' but the tapioca flour helped a lot to get it close as you can without gluten.
Picture

Soaked Tamari Almonds - my go to snack

28/1/2014

 
Print Friendly and PDF
Picture
(Gluten Free, Sugar Free, Vegan)

I love plain almonds.  They have been my go to snack for years.  I always have a jar at my desk, or a small container in my bag when we are out.  Filling, nutritious and natural.

Flavored almonds never did it for me - too much salt or chemicals or just too much flavor that took away the almonds' wonderful natural taste.

Then one day, I tried tamari almonds, the subtle flavor won me over, and I created this super healthy recipe to make them at home with my dehydrator!

Ingredients
  • 1 1lbs bag of unsalted almonds
  • 1/4 cup of gluten free tamari (or coconut aminos)
  • 1-2 teaspoons of pink Himalayan salt

Directions
  • Soak almonds overnight (12 hours) in filtered water
  • Drain almonds, and lay on your non stick sheets on two dehydrator trays
  • Sprinkle tamari over the almonds, and mix well
  • Spread the almonds on the non stick sheets on your dehydrator trays 
  • sprinkle with a bit of pink Himalayan salt
  • Dehydrate at 115 F  for 24-72 or more hours until dry (time will vary) 


Here are some tips to making these:
  • Be sure to use the non stick sheets (or parchment paper) when you first put them in
  • 12-24 hours later, if they are mostly dry take away the non stick sheets and dry them the last few hours on the mesh sheets.
  • Do have patience and try to get them as dry as possible, then let them cool before storing them in a glass jar.  We often dry then for THREE WHOLE DAYS to get them 100% dry and crunchy!

If you don't have a dehydrator, you can do this in an oven on low heat.

Related links
WikiHow - How to Soak Nuts - http://www.wikihow.com/Soak-Nuts
Food Matters - Why to Soak Nuts - http://foodmatters.tv/articles-1/the-benefits-of-soaking-nuts-and-seeds
LantauMama - Dehydrator - Dried Fruits and More - http://www.lantaumama.com/2/post/2013/12/dehydrator-dried-fruits-and-more.html

Picture
With tamari on the dehydrator trays
Picture
18 hours later, dried and ready to eat

Hard Boiled Eggs - Cute Japanese Style

27/1/2014

 
Print Friendly and PDF
Picture
(Gluten Free, Sugar Free, Yeast Free, Dairy Free)

Very short post to go with my Easy Japanese Onigiri post.

Another super healthy school snack is hard boiled eggs. My kids love them!  Sometimes they prefer to be given them in the shell and sometimes peeled.  Other times they request a 'car' or a 'fish'. 

These 'egg molds' are available at most Japanese style stores - in HK this includes Japan Home Store and Justco $12 Living Plaza, but sometimes in the local supermarkets too.  

I recommend organic eggs, and choosing the smallest eggs in the carton for the molds - you can see what happens to the larger eggs in the car crash in the photo.

We also always bring hard boiled eggs with us when we travel - but in the shell.  They are easy to pack and provide a nutritious snack for plane rides and picnics.

Directions
  • Boil organic eggs until very hard boiled
  • Prepare a large bowl of ice water
  • When eggs are done boiling, immediately immerse them in ice water - this makes them easier to peel (really!)
  • Pick a small egg out as soon as it is cool enough to touch, and peel it
  • Put it in the mold, and then immerse the mold in the ice water too.
  • You want to leave the egg in the mold until it is really cold so the egg holds shape - I often put them in the fridge over night.
  • The next day, pack two hard boiled eggs for school snack - one with a fun shape, and one in the shell.  

Picture

Onigiri - Easy Japanese Rice Balls

24/1/2014

 
Print Friendly and PDF
Picture
(Gluten Free, Sugar Free, Yeast Free, Vegan option)

Apologies to all my Japanese friends - please do not read this post.  My Japanese friends make perfectly beautiful onigiri (rice ball) with all the extra traditional ingredients.  Nothing beats a truly Japanese onigiri. The ones I make have three ingredients and are never quite perfectly shaped, most importantly my kids love them!

The basic concept is rice and something else smooshed together in a triangle or small shape.  Then wrap in plain nori seaweed to keep it all together.  

There are lots of other details if you want to get complicated - feel free to google things you can add to the rice, or how you can make a 'surprise' in the middle of the rice ball - but I like to keep it simple!

Next time you have rice for dinner, make a bit extra.
After dinner, put the extra rice in a bowl, and mix in whatever you have - I like using salmon, but you can use shredded chicken or bits of sesame and seaweed or anything you think will taste good.
Mix with a fork
Mash into molds
Take out of molds and store in a covered container in the fridge overnight

Another way of doing it is put the rice in the triangle molds, then use your finger and dig a hole in the middle, then add the salmon, then cover with more rice, then smoosh down - this makes for a 'surprise' in the middle.  My friend did this with feta cheese and her kids loved it, so really be experimental and try it with whatever you have!

They are great for breakfast, lunch boxes, school snacks, plane trips, picnics, and more.

Normally, you would keep the seaweed separate until right before eating.  But my kids prefer me to wrap it for them - it then gets 'soggy' but they say they like it as it holds everything together better.

Look at the photos for different mold shapes and how I make them.

Ingredients
  • Cooked rice (Japanese, white, brown, jasmine, basmati, all work, a bit wet helps)
  • Cooked salmon (see my recipes here) or other filling (can be vegan!)
  • Plain nori seaweed wrappers

Directions
  • Mix the still slightly warm rice in a bowl with your filling - we like salmon
  • Slightly overfill the mold
  • Press down really really hard! You want to mash it all together so it keeps the right shape
  • Take the top off and use the little flap at the bottom to help push the onigiri out
  • Once you have a plate full, either put in fridge, or wrap in seaweed and eat right away

All of the materials shown in the photos below are easily found at Japan Home Store or the Jusco 12 HKD Living Plaza shops located around Hong Kong.

If you can't get the molds, you can use a cup or mug line with plastic wrap it will work the same way.  

Happy onigiri making - do share below how you get on and what interesting filings you try!

Brazilian Cheese Bread - Sandwich Type

18/1/2014

 
Print Friendly and PDF
Picture
(Gluten Free, Sugar Free, Yeast Free) 

I love Brazilian Cheese Bread, Pão de Queijo, as a basic recipe it is tapioca flour, cheese, butter, milk, eggs.  

When I first made them, it was in a blender and they were light more like 'popovers' very easy - but the only thing you could do with them was eat them as a snack. Similar to this recipe from Simply Recipes.

Then I discovered one of my favorite 'restaurants' ever - Mama's Cheese Bread in Brookfield, Connecticut, USA.  They took Brazilian Cheese Balls to a whole different level for me - making them into sandwiches!  I literally had 5 or 6 a week last summer when I was in the USA.  The kids had some of the balls or a sandwich every morning too.  We bought their dough and took it home to bake when guest same over, we were addicted.  Oh, how I miss them now we are back in Hong Kong.  I swear he could make a global chain of his secret recipe.

Now, what I am about to share, is nowhere nearly as good as Mama's Cheese Bread.  But I did want to play around with making a thicker dough, that could be baked into a slightly heavier 'roll' type of bread for mini sandwiches.

As with my other recipes, this is very flexible, so play around until you get a texture you like.

Ingredients
  • 3-3 1/2 Cups** of tapioca flour/starch
  • 1 Tablespoon of baking powder
  • 1 Cup grated parmesan cheese
  • 1 Cup yogurt cheese/farmers cheese or grated mozzarella cheese
  • 1/3 Cup butter or olive oil (room temperature)
  • 2 Eggs (room temperature)
  • 1 Cup of milk (dairy or non dairy)
(**If you want them a bit lighter use less flour)
They are very bland, so if you want to spice it up you can with some black pepper, paprika or other spices - maybe a curry variety? 

Directions
  • Preheat oven to 190C (375F)
  • Prepare two baking trays with parchment/baking paper
Put all the ingredients in your food processor with the plastic S blade in the following order:
  • Tapioca flour
  • Baking powder
  • Mix
  • Add the cheeses
  • Mix
  • Add the butter and eggs
  • Mix
  • Add the milk - add the milk slowly as you might not use it all, you want to stop when you can *just* roll the dough into little balls and they keep their shape
Roll balls and put on your two baking trays.  I tend to do one tray of smaller balls, and one of larger ones which I slightly flatten to use for sandwiches (see photo below).

Bake around 20-25 minutes, until they puff up and start to turn a slight golden color.

Best eaten warm from the oven, or within 12-24 hours.

Niseko Crab Fried Rice and Local Mushrooms

9/1/2014

 
Print Friendly and PDF
Picture
(Gluten Free, Sugar Free)

We go to Niseko in Japan every winter, considered the second snowiest resort on Earth, the powder is incredible.  What we also enjoy is the super fresh food and how everything I cook tastes amazing - even simple dishes like these.

These are so very easy, and super yummy every time!

These recipes are not very exact, as I pretty much wing it each time, but it's very easy and you can't go wrong if you try.

Niseko Crab Fried Rice

Please adjust the amounts, based on how many people you are cooking for.  The below feeds 4 adults and 4 children

Ingredients
  • 2-3 Cups of Japanese white rice
  • 4 Packets of fresh crab sticks (see photo)
  • 6 Fresh local eggs
  • 1 Bag of frozen peas
  • 100% pure sesame oil
  • 1-2 Tablespoons of tamari sauce (can use soy sauce if you are not gluten free)
Directions
  • Make the rice the night before or the morning, so it is cool when you are ready
  • Fry the eggs in sesame oil, chop into small pieces, then set to the side
  • Shred the crab legs
  • Prepare everything in bowls as per the photo below
  • Fry the rice in sesame oil
  • You really want to fry it until bits get brown and crunchy
  • Add a bit of tamari sauce to your taste 
  • add the rest of the ingredients when you feel the rice is fried enough
  • serve hot with a few extra crab sticks on top

Hokkaido Fried Mushrooms

Ingredients
  • 2-3 different varieties of local mushrooms
  • Hokkaido butter
  • Sea salt
Directions
  • Salt the mushrooms
  • Fry the mushrooms in butter until they are dark in color and 50% are crispy
  • This takes a long time and during the process a lot of water will build up in the pan
  • Be patient, the reward is very worth it 

As my husband said, this dish is more about the butter and the salt than the mushrooms!

Warm Edamame
Serve with a bowl of warm edamame in the shell (see the photo below for the one we buy)

This is really one of our favorite dinners at home in Niseko.  Try as I have, I cannot replicate it in Hong Kong or the USA.  It is all about the great Hokkaido ingredients, and our lovely kitchen in Niseko.

Picture
Picture
Picture
Picture
Picture
Picture
Picture

Namaste: Gluten Free Pizza, Muffins and Pancakes

5/1/2014

 
Print Friendly and PDF
Picture
(Gluten Free, Refined Sugar Free)

Going gluten free can be really hard.  Not everything is easy to make from scratch and have it come out great.  An added problem is many of the gluten free foods have some nasty ingredients - but not Namaste Brand, which is a staple in our house.

Prior to making our home wheat and gluten free, I used to bake a lot - breads, muffins, pizza dough etc... all from scratch.  I would use whole wheat flours mixed with white, I would even add gluten to my bread!  

When I first went wheat and gluten free, I would mix flours and make things from scratch... then I discovered All Purpose Gluten Free Flour - yippee!  I still make some things from specific flours, but the AP GF Flour is handy for so many recipes.

For pizzas, muffins and pancakes, all of my gluten free attempts, be they with a mix of healthy flours or using All Purpose Gluten Free Flour, were less than impressive.  I love our cauliflower and also our quinoa pizza crusts, but it's not the same really...

Then I tried Namaste brand, and my whole family fell in love with them!  

Namaste Sugar Free, Gluten Free Muffins
This mix makes perfect fluffy muffins, and we have them a couple times a month. We add cinnamon and vanilla, then a load of frozen raspberries or blueberries - soooo yummy! No sweeteners needed at all. They are best hot from the oven, okay the next day, but the third day quite chewy - so eat them fast :)

Namaste Gluten Free Waffle and Pancake Mix
Much better than anything I have made from scratch (both gluten free and non gluten free). For pancakes, I have to add almost twice the amount of recommended liquid (I like a thinner batter than most people). We just add a bit of vanilla and cinnamon.  You can also use yogurt or milk kefir as the liquid for extra fluffy pancakes.  Add liquid until the batter is the consistency you like. 
We did a taste test with the Arrowhead Mills Gluten Free Pancake Mix, we found Arrowhead Mills a bit heavier, but worth trying to see which you prefer.

Namaste Gluten Free Pizza Crust Mix
We have this once a week, and it is by far a family favorite!  
I followed the instructions exactly, and used my food processor with the plastic blade to mix the batter. 
I line a baking tray with parchment/baking paper and spread the batter thin with an offset spatula.  It's never really even, but it always comes out great!
In the oven, the crust really puffs up, after the recommended 20 minutes, I take it out, flip it, press down any huge bubbles and bake it again for a few minutes for extra crispness, before taking it out again and adding the sauce and cheese before the final bake.  
My favorite cheese is to mix mozzarella and goat cheese! 
Comes out really great every time. The crust has lots of flavor, with a nice crunch. It also works in long thin strips as 'not' bread sticks.
The only negative is that it doesn't really work for 'cold pizza for breakfast' - but then again, it is soooo good, we rarely have leftovers!

Pizza Tips: 
If you have one, use a pizza stone in the oven under the tray
Always cool on a rack before slicing - you can use an oven rack if you don't have anything else

    Picture

    LantauMama's Instagram

    Categories

    All
    Breakfast
    Dessert
    Events
    Fermentation
    Healthy Living
    Hong Kong
    Kefir Class
    Kids
    Niseko
    Recipes
    School
    Snacks
    Tuesday-tips

    Archives

    May 2018
    January 2018
    December 2017
    October 2017
    August 2017
    March 2017
    February 2017
    November 2016
    January 2016
    December 2015
    September 2015
    June 2015
    May 2015
    March 2015
    September 2014
    August 2014
    July 2014
    June 2014
    May 2014
    March 2014
    February 2014
    January 2014
    December 2013
    November 2013
    October 2013

    RSS Feed

    View my Flipboard Magazine.
Thank you so much for taking the time to visit Lantau Mama, truly I am flattered that anyone reads this!  
Feel free to contact me anytime via LantauMama @ Twitter I would love to hear from you.
The links below are how I try to cover my hosting costs without using advertisements.
My Iherb Page
Weebly Discount Link