LantauMama - making healthy living accessible
  • Blog
    • Family Fun
    • Cantonese School
    • About Me
  • Classes
  • Events
  • Shop
  • Links

Salmon Two Ways - Atlantic and Wild

22/10/2013

 
Print Friendly and PDF
We love salmon, because it is both a healthy fish with good oils and super yummy.
In Hong Kong we are very lucky to get excellent salmon from WildC.  They import sustainably sourced fish and sell through their website and deliver to your door in Hong Kong.  Well, in our case because we live 'on the other side of beyond' in Hong Kong terms, they deliver to my husband's office and then he brings them home.

We make them both very differently as wild salmon is much thinner and dryer than Atlantic salmon and therefore needs to be cooked differently.  

There are 1,000's of ways to make salmon, here are two simple recipes.
Picture
Picture
Picture
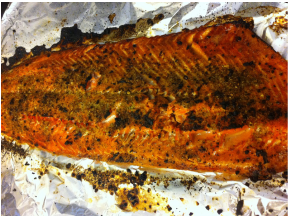
Atlantic Norwegian Salmon Side (also works with fillets)

Placed on a bed of lemongrass (from our garden), put some lemon juice, a bit of saffron, some pepper and mild herbs/spices on top.

Wrapped air tight in foil, if you don't want the fish to touch the foil, you can wrap in parchment paper first and then foil to make it air tight (if you are like me and never mastered origami combined with the french art of fish en papillote).

Placed in a baking pan and also filled baking pan with water for extra steam. Okay, theoretically this isn't necessary, but I am somehow convinced it helps, and at least if in worst case scenario the package leaks, the fish won't dry out.

Bake at 200 for  about 20 minutes - I did it much too long (I forgot about it for 45 minutes!!) and it came out perfectly - this is the beauty of foil/paper wrapped fish - even I can't mess it up!

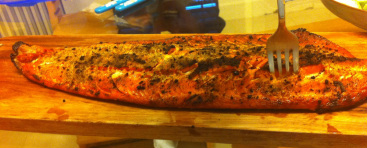
It comes out perfectly moist and tender and the lemongrass smell is fabulous. 

You can flavor with just about anything - don't have lemongrass? No problem, put on a bed of sliced onions, rub in some garlic and fresh basil, a dash of olive oil (really just 2 or 3 dots for flavor), a bit of crushed red pepper, and you have italian style!

If you like moist fish, foil or paper wrapping is a very easy way to guarantee moistness, even when you leave it in the oven much too long!!

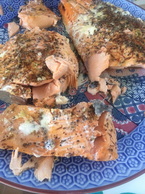
Very moist and soft, totally fell apart when I tried to put it on a plate, but since we will eat it the next 2-3 days, it doesn't really matter. If I had made for guests I would make it look nicer!
Picture
Picture

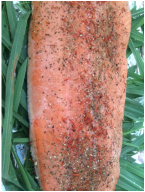
Wild Alaskan Sockeye Salmon Side

This is so easy I don't really have a recipe!

Rinse the salmon with fresh water
Pat dry
Rub on some mixed no salt rub (we like the one from Costco - Organic No Salt Rub)
Grill/Broil in the oven until done - a few bits of the seasoning turn black, and it is done!

This comes out super dry and flakey and packed full of wild salmon flavor.  Often the skin will be crunchy, which is a major bonus as it tastes great.

We usually eat about 2/3 for dinner and the remainder gets made into onigiri (Japanese rice balls - wrapped in seaweed is our preferred style) for the kids the next day and put into my salad for the next day.

Without a doubt this is our favorite salmon dish.

For some much more professional fish recipes, Mark Bittman is my go to:

Mark Bittman, It's Wild Salmon Season

Mark Bittman, Broiled, Sautéed, Roasted, Poached

Raw Zucchini 'Not' Hummus

17/10/2013

 
Print Friendly and PDF
Picture
(raw, vegan, gluten free, sugar free) 

I make this Raw Zucchini Hummus in my Vitamix  - really good, the kids love it and so do my hubby and our friends. 

It is very light, not that heavy feeling of other dips... I often add fresh parsley, so it comes out a lovely light green.

Tastes great with cut veggies, or with raw or salt free chips.  According to one friend, it also tastes great when you get the last bits out with your fingers, then lick them clean!

Ingredients
  • 2 peeled and cut into ¼ pieces raw zucchini (just worked better in Vitamix that way)
  • ¼ Cup tahini (or sesame seeds)
  • just under ¼ Cup lemon juice
  • 1/8 Cup olive oil
  • 2 (or 3) Cloves peeled garlic 
  • 3 Tablespoons of pine nuts (optional)
  • 1 Tablespoon Himalayan pink salt
  • very small handful of fresh parsley

Combine all ingredients in Vitamix or other high power blender and puree until thick and smooth.  I have not tried to make this in a regular blender, but it should work in one or a food processor, maybe just a bit less smooth.

Credits: Inspired by  
http://www.ibreatheimhungry.com/2012/03/low-carb-hummus-bean-free-2.html


Homemade 'healthy' Chocolate or Carob Bark

14/10/2013

 
Print Friendly and PDF
Picture
(Raw Option, Vegan, Gluten Free, Refined Sugar Free and Sugar Free Options) 

Super easy 'healthy' homemade chocolate bark!

The base of this recipe is coconut oil, raw cacao powder or carob powder and a sweetener of your choice.  That's it - just those three things.  After that, it is all up to you how to customize it to your liking.  So don't be intimidated by this long post - it is really just a three ingredient recipe with lots of great options!

No refined sugar required! You can use low GI coconut sugar or stevia** any sweetener of your choice like raw honey or maple syrup.  My friend uses Cocobono Coconut Ginger Sugar and loves the results. 

This isn't the best version of chocolate I make but it is certainly the easiest - takes no more than 5 minutes. Everyone deserves a treat :)

Usually I make it chock full of things: coconut flakes, chia seeds, hemp seeds, smashed nuts and more.

Last week I used carob which is naturally sweeter, so I could use much less sweetener.  

Note: the only carob powder I can find is toasted, not raw, so if you use carob these are not raw.

Picture
Above, is a photo after I have stirred it up and before I freeze it. Then I put a piece of parchment/waxed/baking paper on a dinner plate, and pour it on.

If you don't have much space in your freezer, then put it in your fridge first, and move it to freezer once it is more solid.

You can also put it in little 'truffle' papers - you know those super small muffin papers? That will make make 'clusters' rather than 'bark', or in silicon molds and make pretty chocolates.

To the left, is a picture of chocolate bark after frozen. This batch was so thick I cut it with the cleaver! Chia, hemp seeds, coconut, chock full of goodness...

Do remember, you have to keep these in the freezer, they don't last in the heat so well.  You can also melt them down and use the to dip strawberries or sliced bananas and then refreeze!

With Raw Cacao Powder
These amounts make 1 plate

  • 4 Tablespoons coconut oil
  • 2 Tablespoons coconut butter 
  • 1/4 Cup raw cacao powder
  • Sweetener of your choice to taste (I use around 20 drops of vanilla stevia or 2-3 Tablespoons of coconut sugar/honey/maple syrup - but taste as you go to see how sweet you like it)
With Lightly Toasted Carob Powder
These amounts make 2 plates

  • 8 Tablespoon coconut oil
  • 8 Tablespoon almond butter
  • 1 heaping tablespoon coconut Butter
  • 5 heaping tablespoon carob powder
  • Sweetener of your choice to taste (I used 10 drops of vanilla stevia or 1-2 Tablespoons of coconut sugar/honey/maple syrup - but taste as you go to see how sweet you like it)
Optional additions to either: Himalayan pink salt, vanilla extract, peppermint extract, coconut flakes, hemp seeds, chia seeds, chopped nuts, smashed freeze dried fruit, whatever you fancy

Directions
1.   melt the coconut oil and coconut butter (and nut/seed butter) in your largest glass measuring cup (just because it is easy to pour later then)
2.   add the cocoa or carob powder and stir with a fork until well mixed
3.   add the sweetener of your choice - stirring and tasting after you add some to see if you have the desired level of sweetness
4.   add the peppermint extract (or other flavor or nothing - up to your taste - again tasting along the way)
5.   Mix all well
At this point you can stop and go to step 6, or you can add more - coconut flakes, chopped nuts, chia seeds, hemp seeds, himalayan pink salt, chili powder, ginger, whatever really 
6.   Take a dinner plate or two, put waxed/parchment paper on it, and pour the chocolate mixture on it, smoothing it out with a spatula, spoon or the fork.  
7.   Place in freezer overnight.  
8.   Next day break up the bark into whatever sizes you want, and put in a glass container or a zip lock bag to keep in the freezer, sneaking a guilt free sweet treat when you want one...
9.  Great as gifts and to share!

Credits: I based it on these two great recipes:
http://wholenewmom.com/recipes/homemade-chocolate-or-carob-bar/
http://chocolatecoveredkatie.com/2012/01/15/three-ingredient-chocolate-bars-1/

**Before deciding to use stevia, please read:
http://empoweredsustenance.com/is-stevia-bad-for-you/
(personally for me, I only eat a square or two of the chocolate once a night, and not every night - so I am okay with this limited stevia intake - but that is me.  If stevia effects you negatively, or if you are going to sit down and eat a huge plate of this super yummy chocolate, then do consider one of the more natural sweeteners like coconut sugar, raw honey or maple syrup)

Kale Chips in Hong Kong

10/10/2013

 
Print Friendly and PDF
Picture
European/American 'Curly' Kale is crazy expensive in Hong Kong, and only available two days a week. In the land of plenty where everything is sold, this is highly unusual.

We love homemade kale chips in the dehydrator, so about twice a year we treat ourselves to a huge batch... but Sassy inhales most of them by herself!

Our tastes are simple.  We prefer either plain kale chips - with absolutely nothing on them.  Or just with a tiny amount of olive oil and a bit of nutritional yeast. The flavor of kale itself is so beautiful, no need to cover it up with strong flavors.

I dehydrate at 105 degrees for about 12 hours and they are done to perfection, exact times will vary based on the humidity and temperature the day we do it.

When I was in the USA this past summer, I had kale 2 times most days - in my smoothies, in my salads, and as chips... missing it now!

Funny, because when I first heard of people eating and drinking kale, my reaction was 'but it is sooooo bitter!' Because in HK, we have a vegetable we call kale in English, but in Chinese is 芥兰  (芥蘭) pronounced jièlán (mandarin) or gaai3 laan4 (cantonese)   A bit bitter, but super tasty when lightly fried with garlic!

I enjoyed this New York Times article, and promptly sent it to all my friends in Paris suggesting this woman becomes their new BFF: Trendy Green Mystifies France. It's a Job for the Kale Crusader!

Related post - how to make Frozen Kale Muffins for your morning green smoothie

Where to get Curly Kale in Hong Kong:
Green Queen's Guide to Kale in Hong Kong
Green Vitamin (It's organic, grown in HK and they have kale chips too!)
Just Green with locations around HK
Spice Box Organics in Sai Ying Pun
Great Supermarket in Pacific Place
Corner Block on Stanley Street in Central
Culture Organic Foods online shop
Eat Fresh has kale sometimes

Picture
Picture

Healthy School Snacks

3/10/2013

 
Print Friendly and PDF
Picture
This is the sort of food my kids get at school for lunch. They also get a tiny pot of fruit - about 4 or 5 pieces of mellon or fruit. Honestly, it is not awful, nor is it repetitive. We used to have 4 choices a month, A, B, C or D, with D always being vegetarian.  

Recently they changed their kitchen and now make the rice and veggies fresh at the school, and offer two choices a 'Meat Set' with two meat dishes and a 'Vegetarian Set' with one vegetarian dish.  Both are served with rice and veggies.  There are no repeated options in the month - which is pretty impressive!  I have to order a month in advance, and the cost is about 18 HKD a day (2.30 USD)  (I'll add a link or photo to a sample monthly menu from the school when I get it next month)

I read through the menu with the kids, and they pick what they want in advance - last month every week was 4x vegetarian sets and 1x meat set a week.  This month they went for vegetarian every day.  I don't have a photo of the new lunches yet, but according to my kids and some of the moms they are much better than before. 

The school is also going 'green' and requires the kids to each bring their own utensils - chopsticks, fork and spoon.  

The kids also can bring snacks to eat at recess or after lunch, but they often save them for after school.

We have two small plastic boxes for each of them.
  • One usually has apples or grapes or carrots or similar
  • The other usually has seaweed (plain nori), crackers, crunchy edamame, homemade goldfish crackers, Scottish oat cakes, or other filling foods
  • Sometimes I throw in a cheese stick
  • Occasionally they might get an extra treat like dried fruit or fruit roll up sort of thing we make at home.
  • They often request these Cute Hard Boiled Eggs

And on days we have leftover rice and salmon I make them these Onigiri - Easy Japanese Rice Balls which they really like.

If they don't eat everything, I am not fussed - it is giving them healthy options to choose from, and if they are hungry enough, they will eat them. If not, no problem.

Related Links:


I'm lazy, and don't always manage to make homemade healthy treats every week.  I appreciate being able to buy some foods from iHerb, it saves me a lot of time and it feels like a real treat to the kids!  

Some of the more processed and convenient snacks I often buy:

Dry Roasted Edamame 
Tamari Seaweed Brown Rice Snaps
Vegetable Brown Rice Snaps
Inka Corn Snacks
Nori Maki Crackers
Freeze Dried Peas and Corn and More
Freeze Dried Fruits

For a very special treat, I make my homemade 'not so sweet raw balls' or just get these, and I cut the squares up even smaller into 4 small pieces and give them 2 little pieces:

Cacao Goji Superfood Power Snack
Citrus Chia Superfood Power Snack 

I use my dehydrator to make dried fruits and sometimes homemade fruit roll ups, but am also considering these healthy sort of fruit roll up stuff as special treats:

Cinnamon Spiced Beet Bars
Fruit Veggie Shreds Super Apple
Fruit Veggie Shreds Rooty Blues
Eden Foods Nuts, Seeds and Berries Mix

    Picture

    LantauMama's Instagram

    Categories

    All
    Breakfast
    Dessert
    Events
    Fermentation
    Healthy Living
    Hong Kong
    Kefir Class
    Kids
    Niseko
    Recipes
    School
    Snacks
    Tuesday-tips

    Archives

    May 2018
    January 2018
    December 2017
    October 2017
    August 2017
    March 2017
    February 2017
    November 2016
    January 2016
    December 2015
    September 2015
    June 2015
    May 2015
    March 2015
    September 2014
    August 2014
    July 2014
    June 2014
    May 2014
    March 2014
    February 2014
    January 2014
    December 2013
    November 2013
    October 2013

    RSS Feed

    View my Flipboard Magazine.
Thank you so much for taking the time to visit Lantau Mama, truly I am flattered that anyone reads this!  
Feel free to contact me anytime via LantauMama @ Twitter I would love to hear from you.
The links below are how I try to cover my hosting costs without using advertisements.
My Iherb Page
Weebly Discount Link